
aPlus+ Attendance Quick Start Guide
STEP 1: Enable the aPlus+ Attendance tool in your course
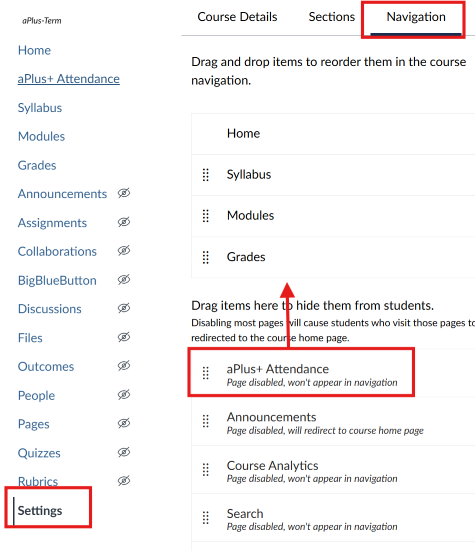
- Open your Canvas course and navigate to Settings on the course menu.
- Select the Navigation tab.
- Scroll to the bottom and locate aPlus+ Attendance. Click the 3 dots next to it, and choose Enable.
- You can drag it to rearrange it's placement on your course menu
- Scroll to the bottom and click Save
STEP 2: Open Canvas Course aPlus+ Attendance
- From your course menu, select the aPlus+ Attendance link
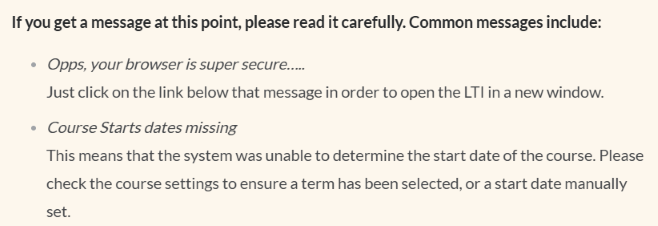
- The first time you click the link, you will be asked to Authorize. Click the Authorize button.
- The tool will refresh to load the latest data.
STEP 3: Canvas Attendance Setup
This is an important step where you will determine how attendance will be used in your course and how you might want to use the attendance assignment in grading. Since this is a lot of information, please refer to the official documentation.
Your class meeting times have been pre-loaded into the system so aPlus+ knows when you should be meeting.
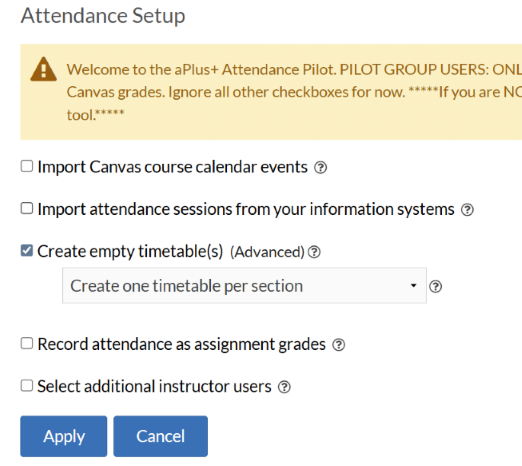
On the attendance setup screen, only use the following boxes:
- Create empty timetable(s)
- This ONLY applies if your sections are cross-listed in Canvas
- If your courses are NOT cross-listed, leave this checked, and "Create one timetable per section" selected
- Talk to Troy before changing this option
- Record Attendance as assignment grades
- This is where you will determine how attendance is graded using points and a set of rules. See documentation button below.
- Select additional instructor users
- You can use this option to delegate aPlus+ access to a TA.
Record Attendance as Assignment Grades
An overview of the options is as follows:
- Proportional - Where the proportion of sessions attended vs sessions taught (to date), is applied against a point value for the attendance assignment.
- Rule Based Percentage Penalty of Total Grade (not compatible with weighted assignments in gradebook) - Where the instructor defines a set of attendance rules, which once breached, trigger a percentage penalty against the students’ total grade.
- Rule Based Absolute Points Penalty - Where the instructor defines a set of attendance rules, which once breached, trigger a point’s penalty against the student.
- Raw Points By Session Attended - Where the instructor can enter the number of sessions, and define the points value of attendance overall, meaning each session attended makes up a proportion of that attendance. Attendance is shown as a proportion of sessions attended, vs all sessions (not just the ones that have passed).
This can be challenging, depending on your grading scheme and we may need to work through this together. Click the button below to view the full documentation for recoding attendance as an assignment grade.
STEP 4: Navigating the Attendance tool
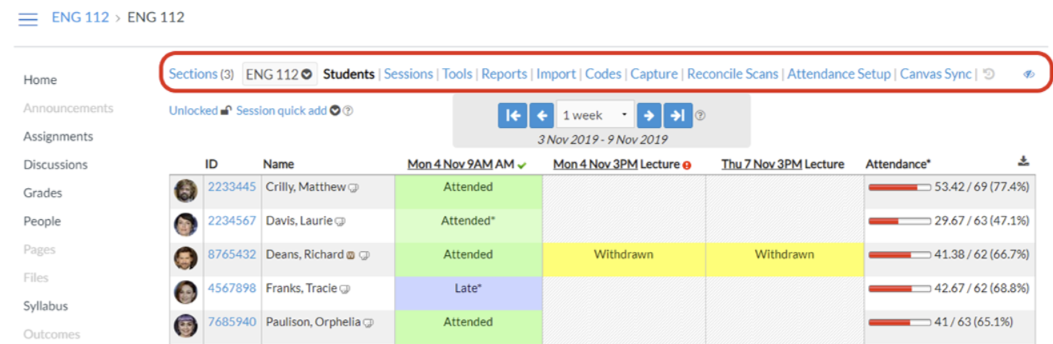
- Sections: Use this dropdown to move between the sections for this course.
- Students (shown above): The most common view for viewing and managing recent attendance.
- Sessions: Viewing the timetable data that is setup for this course and its sections. It is also where you would edit timetable data if you are managing timetables manually.
- Tools: This can be ignored unless you need to delete a timetable. Your Canvas administrator can assist with this.
- Reports: Course level reports can be accessed here.
- Import: This can be ignored and is an advanced feature only.
- Codes: For installations using Student Self Registration Codes, this opens the Code control window.
- Attendance Setup: Access to the Attendance Setup screen
- Canvas Sync: Forces a refresh of the Canvas data.
- Clock Icon: View the Canvas sync history.
- Eye Icon: Privacy mode. Masks the screen for situations where students may be able to see the screen (such as when using USB scanning).
STEP 5: Recording Attendance in Canvas
There are several methods available for recording attendance covered in this section. Some these may not be enabled on your system and others may not be appropriate for your situation.
- Manual entry by status and/or time - entering attendance manually for each student
- Student code self-registration - students enter a unique code provided to them by their instructor
- This will likely be the most popular choice.
- This allows for a rotating QR or alphanumeric code that students scan or enter to 'check in'.
- USB scanning entry by status and/or time - students scanning their ID cards into the web browser
- Not available yet
- Stand-alone scanners or kiosks - recording attendance by students scanning their ID cards or entering their details.
- Not available yet
Click HERE to view documentation for Recording Attendance
The abbreviated instructions for recording attendance:
- In your course, after you've clicked the aPlus+ Attendance link on your course menu, you can decide which method you want to use: Manual Entry or Codes
- If Manual Entry, click the date at the top of the column for the day you are taking attendance.
- You will see a list of your students. Click the dropdown menu next to their name and choose a status.
- When finished with all students, click Save.
- If using Codes, students will check in using a QR or alphanumeric code. Click Codes on the attendance screen.
- Confirm the entry method dropdown at the top. I suggest Rolling Code or QR Code
- Click the START button for the date and time you are taking attendance.
- NOTE: you can change the speed of the rotation at the top left. This helps prevent sharing of the codes.
- Click the STOP button when all students have been given a chance to check in.
- When you stop the code screen, notice the privacy window is activated. This prevents students from seeing other's attendance data. Consider NOT projecting to the class before the codes are being shown. When finished, pause the projection, and exit the attendance screen.
- You can manually change student statuses as needed, such as making someone Late, Absent - Excused, Absent - No Reason, etc.