Using Kaltura for Nursing Simulation
First-time Users: Before you can save a recording to your UTCID, you must authorize Kaltura in Canvas by following the steps in View Recordings below. You need do this only once. Instructors: consider asking all of your students to authorize Kaltura (perhaps as a non-credit assignment in Canvas) before their first simulation.
Make Recordings
Watch video of the steps below
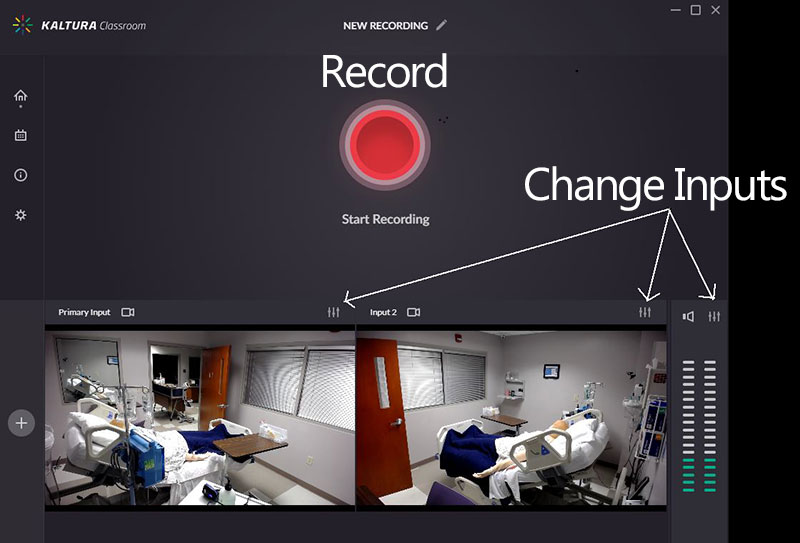
- Check that all cameras are showing a proper view of the room and that audio is working (green bars on right must be responsive to sound). Cameras wrong or missing? See troubleshooting below.
- Press the big red button to record. Once recording, if you have time to click the pencil icon at the top middle, you can modify the name of the recording and enter your UTCID to save time later (steps 4 and 5 below).
- Press the square button to the left of the red button to stop recording.
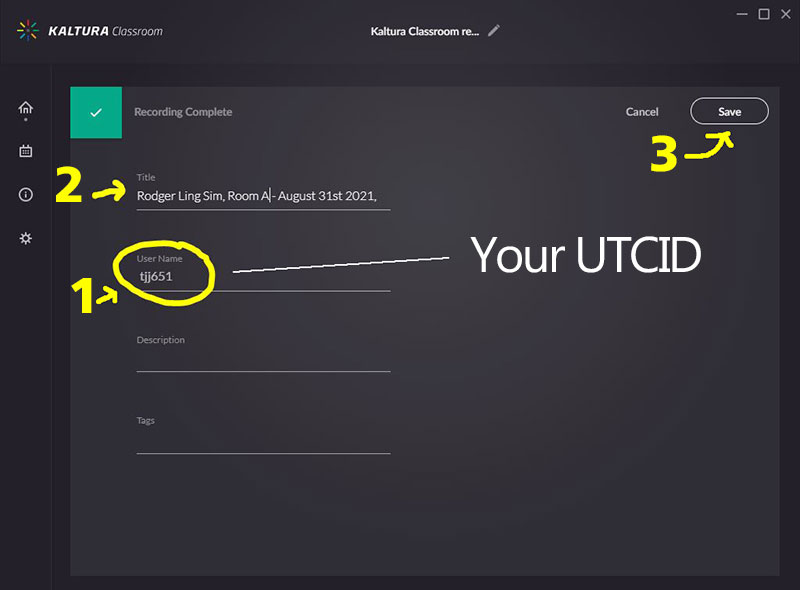
- CRITICAL STEP: Enter your UTCID in the User Name box. (If your UTCID is not found, you may need to “authorize” Kaltura by following the steps in VIEW RECORDINGS. If you do not enter a valid UTCID, the recording will be saved as Rodger Ling. Contact Rodger or the Walker Center staff to access.) Hint: You can click the pencil at the top middle of the recording window while a recording is in progress and edit the recording name and enter your UTCID before the recording finishes if you like.
- Recommended: Replace the generic “Kaltura Classroom Recording” part of the title with something meaningful, such as the name of the student being recorded, but leave the date/time. You can add a description or “tag” the recording with key words, but adding these are optional.
- Click the SAVE button at upper right.
View Recordings
Watch video of the steps below
- Log into Canvas with your UTCID and password.
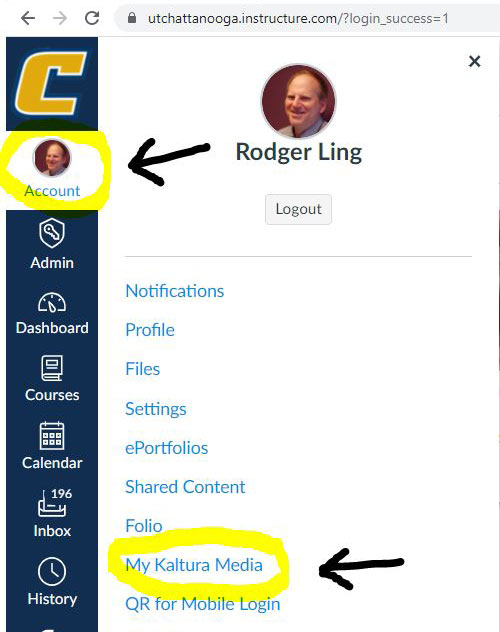
- Click ACCOUNT at upper left, then choose MY KALTURA MEDIA (if this is your first visit, you'll be prompted to authorize Kaltura).
- If more than one camera (or screen capture) has been recorded, hover over the top right of the screen to change/swap views.
Share Recordings
To share with everyone in a Canvas class: You can EMBED a recording into an assignment, page, announcement, etc. in Canvas if you would like everyone in the class to see it.
View a video of the steps below
- In the Canvas class, create an item (page, announcement, assignment, etc.) Most often, you will want to create a page.
- In menu above the text box, click the “electric plug” icon (or three dots to see more icons), then EMBED KALTURA MEDIA. You can then select from your Kaltura Media (click the EMBED button).
- Save and Publish the item.
To share with individuals: Add them as COLLABORATORS with permission to “co-view” the recording.
View a video of the steps below
- Go into MY KALTURA MEDIA by clicking ACCOUNT in the Canvas Dashboard.
- Click on the recording you wish to share.
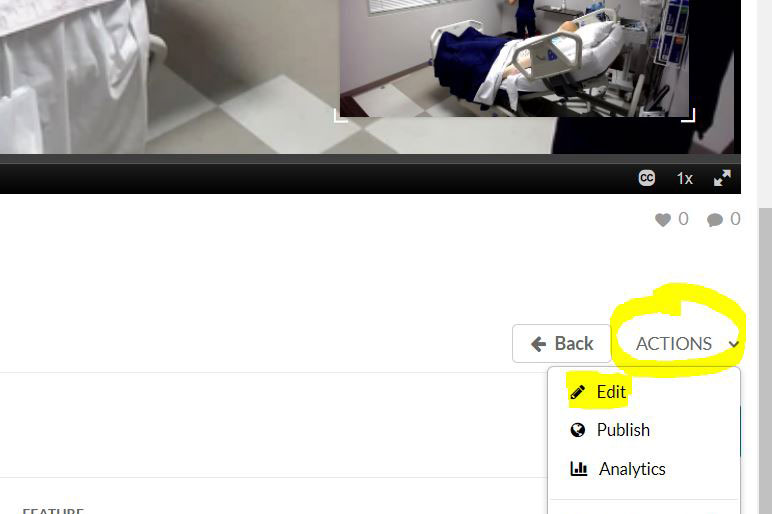
- Scroll down and click ACTIONS on the right, then EDIT.
- Click COLLABORATION in the horizontal menu, then ADD COLLABORATOR.
- Start typing a UTCID or name to add a person. If they do not appear, they may need to “authorize” by following the steps to VIEW RECORDINGS above.
An alternative method to share with a limited audience would be to embed the video into a new assignment (as if you were going to share with the class, as detailed above) but assign the assignment only to that one individual(s) by removing "everyone" from the ASSIGN TO area and searching for individuals by name. This method doesn't require the viewer to "authorize" Kaltura first. However, if you do much of this you will end up with a lot of assignments cluttering your class (fortunately, the clutter is viewable only to you) and must be careful not to interfere with assignment weighting.
To share with the public: It is possible to set a recording to "unlisted" and create a link that anyone can view without a login, but to do this you must be set up to use utc.mediaspace.kaltura.com by the Walker Center or make Rodger Ling the owner so that he can generate the link for you.
Troubleshooting
- 1. Not showing room on camera?
-
Watch video of this process
At top right above camera view, click “three vertical lines” icon. Change input source to webcam, then click BACK at top right. Similar fix for audio settings. If webcam does not appear in list, unplug webcam for a moment (either at the webcam or the back of the computer), then plug it back in. If it still doesn't appear, restart the computer. NOTE: The laptops in Davenport are particular about which USB port is used--use only the single USB port on the RIGHT side of the laptop, which provides the "charging" power supply needed.
- 2. No live audio in headphones?
-
Watch video of this process
In order to listen to live audio through the Kaltura computer, Windows must be set to “listen to this device.” Right-click volume icon in taskbar, click OPEN SOUND SETTINGS, scroll down to DEVICE PROPERTIES under INPUT, click ADDITIONAL DEVICE PROPERTIES, click LISTEN tab, click check-box next to “listen to this device.” Note: this will create a feedback loop if computer speakers are used rather than headphones.
- 3. UTCID or name not recognized when saving recording or adding collaborator?
-
The person needs to log into Canvas and authorize Kaltura by going to their account profile, then MY KALTURA MEDIA.
- 4. Recording does not show in Canvas under MY KALTURA MEDIA?
-
It can take a few minutes for a recording to process and show (the longer the recording, the longer the time to process). If recording does not appear, check to be sure recorder is not still on the “save” screen or the recording was paused rather than stopped. If that’s not the case, you may have not entered your UTCID before saving. If you ever edit the recording and change the “owner” to someone else, you will lose access. In any of those cases, contact Rodger or the Walker Center.
- 5. Green sound bars not moving?
-
Always check to see that the sound bars on right of screen are responsive to sound. If not, click the three dots above to change the input to the proper device--typically the webcam, not the system audio.
- 6. Not getting audio from simulation room?
-
In Davenport, the audio source should always be the Liveshot camera, NOT the Realtek or other system audio.
Hints & Recommendations
- If recording more than one student or scenario, make separate recordings rather than one long recording to speed processing time. Previous recordings will process while new recordings are being made.
- Consider asking all of your students to authorize Kaltura (perhaps as a non-credit assignment in Canvas) before their first simulation. This way you can add them as collaborators later if you wish to share a recording with them but not the entire class.
- You can make comments on a recording in Canvas and (by clicking a checkbox) tie the comment to a specific moment in the video.
- You can edit the recording title (typically to add the student name) and enter your UTCID for where it should be saved while the recording is in progress. Simply click the pencil icon at the top middle of the recording screen, make the changes, and be sure to click SAVE. Now the title and UTCID will be filled in for you when you end the recording and all you need to do is click SAVE.
- Simple editing of recordings is possible within Kaltura. Click the pencil icon to the right of the video in My Kaltura Media, then the LAUNCH EDITOR button. See video. You can trim the start and stop points. To cut something from the middle, first split the clip, then trim. You cannot, however, combine two separate videos into one--for that you need a dedicated video editor.
More Information
For background information on how Kaltura was chosen for this project, see the April 2021 document Simulation Recording Options or contact [email protected]. As part of our campus contract, Kaltura provides unlimited cloud storage for our recordings.
Room Configurations:
Our Metropolitan Building Simulation Rooms ("Safe Hospital") are equipped with two Logitech C930e webcams ($85 each), Active USB extension cables, and Dell Optiplex 3010 and 7100 desktop computers which were in our existing inventory (no additional cost). The cameras are currently wall-mounted with options for ceiling mount should faculty prefer. Total cost per room, assuming computers were to be purchased and Kaltura was already available, is approximately $1,200.
There is a similar setup in our Anesthesia Simulation space and also a simple "mobile cart" with a desktop and single webcam for use anywhere in the building.
Our Davenport Hall NP Simulation Rooms are equipped with a single Vaddio ConferenceSHOT AV bundle (USB camera with separate ceiling microphone, $2,700 each), Active USB extension cables, Dell laptops (from existing inventory) and (pending installation) wall-mounted PTZ controls. In Davenport we will also have three mobile carts with 65" Sony TVs ($1,550 each), Vaddio HuddleSHOT cameras ($1,370 each). Total cost per mobile cart was $3,900.


